When
you are in the editing mode of RubiStar, you may choose one of four options:
edit the rubric information, edit the column names, edit the rubric row
names, or edit the rubric content.
Edit
the rubric information
To edit any of your rubric
information, click the Edit Rubric Info button.

Here you will be able to
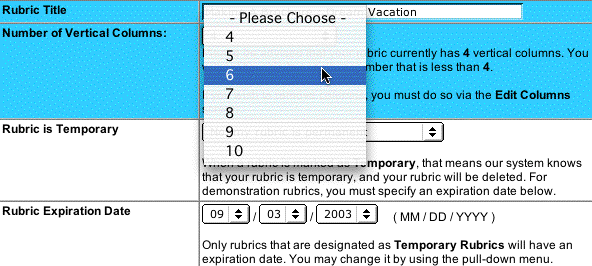
change certain aspects of your rubric, like the title. You can also change
the amount of columns your rubric contains simply by selecting a number
from the drop down menu, as shown below. This is a great help if you would
like to have a rubric with more than a four point rating scale.

You may also choose to assign
an expiration date to your rubric, which will mean that you must first
select Yes, my rubric is temporary from the drop down
menu. Only temporary rubrics have expiration dates. This would be ideal
if you know that you will not need the rubric for an extended period of
time.
Once you are finished, click
the Submit button.
Edit the column names
If you would like to change
the order of your columns or add new columns, then click the Edit
Column button.

Here, you may specify
the order of the different columns in your rubric. You can use the Right,
Left, and Delete buttons to rearrange your columns. In the image below
the category Outstanding would be moved to the right once the link is
clicked.

You can also add new
columns to your rubric under this section. Under the subtitle Add
a new column to this rubric type the new column name into the
text box and click the Add New Column, as shown in the
image below.

You can then rearrange
the order of your columns once again to fit your needs. You will also
want to add content to this new column by going to the Edit
Rubric Content section.
If you have accidentally
deleted a column you wanted to keep, then you can use the final section
in this area. Under the subtitle Template Rubric Column,
a list of deleted columns will appear. If you decide you did want one
of these columns that you deleted, you can click on the Add
 button next to the column you would like to keep. Refer to the image below.

Edit the rubric row names
If you would like to edit
the row names, then click the Edit Rubric Row Names button.

Now you will be able to rename
the category headings, move rows up and down, add new rows of your own,
or add categories on the template that you had originally not selected.
To change the category headings,
simply highlight the old heading and type the new name, as shown in the
image below.

Notice in the image above
that there are also Up, Down, and Delete
links for you to rearrange the order of your rows. Be sure that once you
are finished renaming the categories and moving or deleting them, that
you click the Update Rows button.
Under the subtitle Add
New Rows, type in the blank text boxes any category headings
that you would like to add to the rubric. Again, you will want to edit
your rubric content to fill in the rating boxes for your new category.
Then click the Add New Row(s) button.
If you would like to add
some categories from the template that you had not previously added, then
scroll down to the subtitled section Add Rows(s) from your Original
Template. Press the Add  button next to the category you would like to add.
Edit the rubric contents
To update or edit your rubric
content, click on the Edit Rubric Contents button.

Notice that any rows or columns
of your own that you added in the previous two sections will have blank
boxes. You will need to fill these boxes with your own words. Be sure
that your rubric maintains its constancy across the rating scale. To enter
your own words, simply click in the empty box and type as you would in
a word processor.
You also have the chance
to change the column headings or rating scale while in this editing section.
The Reset
buttons are again available for you to revert back to the original text
in the template.
When you have finished making
the changes click the Submit button.
Back to RubiStar Tutorial Menu
|